@Embeddable
@Embedded
@EmbeddedId
http://www.thejavageek.com/2014/05/01/jpa-embeddedid-example/
Tuesday, June 16, 2015
Monday, June 8, 2015
Effective Java - Chapter 07
Item 38: Check parameters for validity
Item 39: Defensive copy
- Detect errors as soon as possible
- For public methods, use the Javadoc @throws tag to document the exception that will be thrown if a restriction on parameter values is violated
- Non-public methods should generally check their parameters using assertions.
In summary, if a class has mutable components that it gets from or returns to its clients, the class must defensively copy these components. If the cost of the copy would be prohibitive andthe class trusts its clients not to modify the components inappropriately, then the defensive copy may be replaced by documentation outlining the client’s responsibility not to modify the affected components.
- You must program defensively, with the assumption that clients of your class will do their best to destroy its invariant.
- experienced programmers often use the primitive long returned by Date.getTime() as an internal time representation instead of using a Date reference. They do this primarily because Date is mutable.
- Defensive copying can have a performance penalty associated with it and isn’t always justified.
Sunday, May 31, 2015
Effective Java - Chapter 3
Item 11: Clone
Item 12: Comparable
- if a class implements Cloneable, Object’s clone method returns a field-by-field copy of the object; otherwise it throws CloneNotSupportedException.
- all classes that implement Cloneableshould override clonewith a public method whose return type is the class itself.
- You can increase the scope of access modifiers of an overridden method
- Calling method clone won't call the constructor
- It's OK if using super.clone() to clone immutable object. If object is mutable, we have to manually clone its properties which are mutable (like array, set, list, mutable class, ...).
- When working with thread-safe, Object’s clonemethod is not synchronized, you may have to write a synchronized clone method that invokes super.clone().
- it’s safe to say that other interfaces should not extend it, and that classes designed for inheritance (Item 17) should not implement it. Because of its many shortcomings, some expert programmers simply choose never to override the clonemethod and never to invoke it except, perhaps, to copy arrays.
Item 12: Comparable
- override compareTo method
- sometimes, compareTo method is not consistent with equals method
- Collection, Set, Map use equals method to check for existence, while sorted collections like TreeSet, TreeMap use compareTo method.
Saturday, August 2, 2014
Saturday, July 26, 2014
Ruby on Rails Tutorial - Learn Rails by Example, Michael Hartl
Contents
Chapter 1 From zero to deploy
1.1 Introduction
1.1.1 Comments for various readers1.1.2 “Scaling” Rails
1.1.3 Conventions in this book
1.2 Up and running
1.2.1 Development environments1.2.2 Ruby, RubyGems, Rails, and Git
1.2.3 The first application
1.2.4 Bundler
1.2.5 rails server
1.2.6 Model-view-controller (MVC)
1.3 Version control with Git
1.3.1 Installation and setup1.3.2 Adding and committing
1.3.3 What good does Git do you?
1.3.4 GitHub
1.3.5 Branch, edit, commit, merge
1.4 Deploying
1.4.1 Heroku setup1.4.2 Heroku deployment, step one
1.4.3 Heroku deployment, step two
1.4.4 Heroku commands
Chapter 2 A demo app
2.1 Planning the application
2.1.1 Modeling demo users
2.1.2 Modeling demo microposts
2.2 The Users resource
2.2.1 A user tour
2.2.2 MVC in action
2.2.3 Weaknesses of this Users resource
2.3 The Microposts resource
2.3.1 A micropost microtour
2.3.2 Putting the micro in microposts
2.3.3 A user has_many microposts
2.3.4 Inheritance hierarchies
2.3.5 Deploying the demo app
2.4 Conclusion
Chapter 3 Mostly static pages
3.1 Static pages
3.2 Our first tests
3.2.1 Test-driven development
3.2.2 Adding a page
3.3 Slightly dynamic pages
3.3.1 Testing a title change
3.3.2 Passing title tests
3.3.3 Embedded Ruby
3.3.4 Eliminating duplication with layouts
3.4 Conclusion
3.5 Exercises
3.6 Advanced setup
3.6.1 Eliminating bundle exec
3.6.2 Automated tests with Guard
3.6.3 Speeding up tests with Spork
3.6.4 Tests inside Sublime Text
Chapter 4 Rails-flavored Ruby
4.1 Motivation
4.2 Strings and methods
4.2.1 Comments
4.2.2 Strings
4.2.3 Objects and message passing
4.2.4 Method definitions
4.2.5 Back to the title helper
4.3 Other data structures
4.3.1 Arrays and ranges
4.3.2 Blocks
4.3.3 Hashes and symbols
4.3.4 CSS revisited
4.4 Ruby classes
4.4.1 Constructors
4.4.2 Class inheritance
4.4.3 Modifying built-in classes
4.4.4 A controller class
4.4.5 A user class
4.5 Conclusion
4.6 Exercises
Chapter 5 Filling in the layout
5.1 Adding some structure
5.1.1 Site navigation
5.1.2 Bootstrap and custom CSS
5.1.3 Partials
5.2 Sass and the asset pipeline
5.2.1 The asset pipeline
5.2.2 Syntactically awesome stylesheets
5.3 Layout links
5.3.1 Route tests
5.3.2 Rails routes
5.3.3 Named routes
5.3.4 Pretty RSpec
5.4 User signup: A first step
5.4.1 Users controller
5.4.2 Signup URL
5.5 Conclusion
5.6 Exercises
Chapter 6 Modeling users
6.1 User model
6.1.1 Database migrations
6.1.2 The model file
6.1.3 Creating user objects
6.1.4 Finding user objects
6.1.5 Updating user objects
6.2 User validations
6.2.1 Initial user tests
6.2.2 Validating presence
6.2.3 Length validation
6.2.4 Format validation
6.2.5 Uniqueness validation
6.3 Adding a secure password
6.3.1 A hashed password
6.3.2 Password and confirmation
6.3.3 User authentication
6.3.4 User has secure password
6.3.5 Creating a user
6.4 Conclusion
6.5 Exercises
Chapter 7 Sign up
7.1 Showing users
7.1.1 Debug and Rails environments
7.1.2 A Users resource
7.1.3 Testing the user show page (with factories)
7.1.4 A Gravatar image and a sidebar
7.2 Signup form
7.2.1 Tests for user signup
7.2.2 Using form_for
7.2.3 The form HTML
7.3 Signup failure
7.3.1 A working form
7.3.2 Strong parameters
7.3.3 Signup error messages
7.4 Signup success
7.4.1 The finished signup form
7.4.2 The flash
7.4.3 The first signup
7.4.4 Deploying to production with SSL
7.5 Conclusion
7.6 Exercises
Chapter 8 Sign in, sign out
8.1 Sessions and signin failure
8.1.1 Sessions controller
8.1.2 Signin tests
8.1.3 Signin form
8.1.4 Reviewing form submission
8.1.5 Rendering with a flash message
8.2 Signin success
8.2.1 Remember me
8.2.2 A working sign_in method
8.2.3 Current user
8.2.4 Changing the layout links
8.2.5 Signin upon signup
8.2.6 Signing out
8.3 Introduction to cucumber (optional)
8.3.1 Installation and setup
8.3.2 Features and steps
8.3.3 Counterpoint: RSpec custom matchers
8.4 Conclusion
8.5 Exercises
Chapter 9 Updating, showing, and deleting users
9.1 Updating users
9.1.1 Edit form
9.1.2 Unsuccessful edits
9.1.3 Successful edits
9.2 Authorization
9.2.1 Requiring signed-in users
9.2.2 Requiring the right user
9.2.3 Friendly forwarding
9.3 Showing all users
9.3.1 User index
9.3.2 Sample users
9.3.3 Pagination
9.3.4 Partial refactoring
9.4 Deleting users
9.4.1 Administrative users
9.4.2 The destroy action
9.5 Conclusion
9.6 Exercises
Chapter 10 User microposts
10.1 A Micropost model
10.1.1 The basic model
10.1.2 The first validation
10.1.3 User/Micropost associations
10.1.4 Micropost refinements
10.1.5 Content validations
10.2 Showing microposts
10.2.1 Augmenting the user show page
10.2.2 Sample microposts
10.3 Manipulating microposts
10.3.1 Access control
10.3.2 Creating microposts
10.3.3 A proto-feed
10.3.4 Destroying microposts
10.4 Conclusion
10.5 Exercises
Chapter 11 Following users
11.1 The Relationship model
11.1.1 A problem with the data model (and a solution)
11.1.2 User/relationship associations
11.1.3 Validations
11.1.4 Followed users
11.1.5 Followers
11.2 A web interface for following users
11.2.1 Sample following data
11.2.2 Stats and a follow form
11.2.3 Following and followers pages
11.2.4 A working follow button the standard way
11.2.5 A working follow button with Ajax
11.3 The status feed
11.3.1 Motivation and strategy
11.3.2 A first feed implementation
11.3.3 Subselects
11.3.4 The new status feed
11.4 Conclusion
11.4.1 Extensions to the sample application
11.4.2 Guide to further resources
11.5 Exercises
Saturday, March 29, 2014
BufferBloat
INTRODUCTION
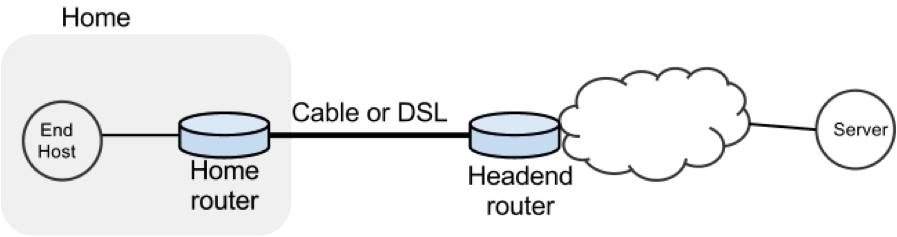
In this exercise we will study the dynamics of TCP in home networks. Take a look at the figure below which shows a “typical” home network with a Home Router connected to an end host. The Home Router is connected via Cable or DSL to a Headend router at the Internet access provider’s office. We are going to study what happens when we download data from a remote server to the End Host in this home network.
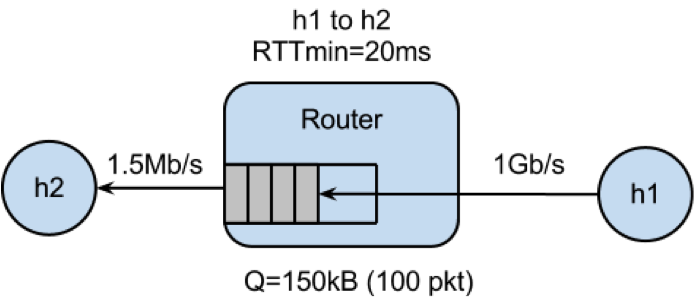
In a real network it’s hard to measure cwnd (because it’s private to the Server) and the buffer occupancy (because it’s private to the router). To make our measurement job easier, we are going to emulate the network in Mininet (See Environment Setup for setting up the environment).
The goals of the exercise are to:
- Learn first-hand the dynamics of cwnd and buffer occupancy in a “real” network.
- Learn why large router buffers can lead to poor performance in home networks. This problem is often called “Buffer Bloat.”
- Learn how to use Mininet so you can repeat or extend the experiments in your own time.
PART 1: GET MININET UP AND RUNNING
Get the Bufferbloat Topology
The bufferbloat topology is in svn under the hw8 directory.
Run the Mininet Emulator
> cd cs144_bufferbloat/
> sudo ./run.sh
Measure the Delay Between the Two Hosts
After Mininet is running, you can measure the delay from H1 to H2 with the command: mininet> h1 ping -c 10 h2
PART 2: WEB PAGE DOWNLOAD - SKETCH THE TCP CWND
Measure how long it takes to download a web page from H1
mininet> h2 wget http://10.0.0.1Sketch how you think cwnd evolves over time at H1. Mark multiples of RTT on the x-axis.
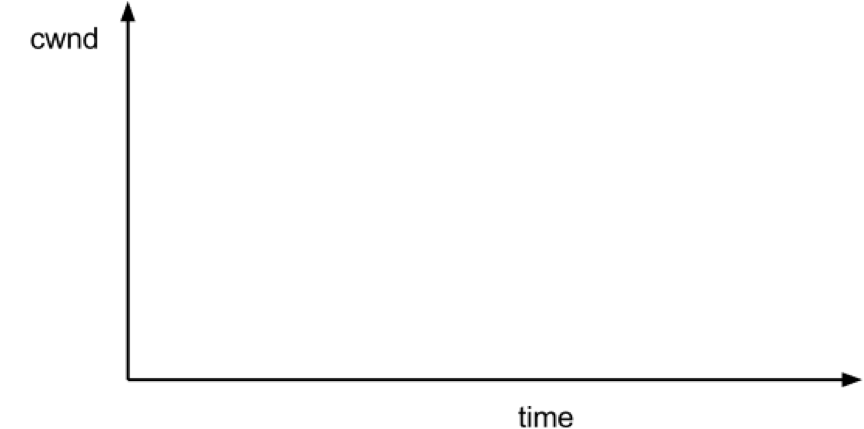
PART 3: “STREAMING VIDEO” - SKETCH THE TCP CWND AND BUFFER OCCUPANCY.
Create the Video Flow
To see how the dynamics of a long flow (which enters the AIMD phase) differs from a short flow (which never leaves slow-start), we are going to repeat Part 2 for a “streaming video flow”. Instead of actually watching videos on your machine, we are going to set up a long-lived high speed TCP connection instead, to emulate a long-lived video flow. You can generate long flows using the iperf command, and we have wrapped it in a script which you can run as follows:
mininet> h1 ./iperf.sh
You can see the throughput of TCP flow from H1 to H2 by running:
mininet> h2 tail -f ./iperf-recv.txt The TCP CWND of the Video Flow
Sketch how you think cwnd evolves over time at H1. You might find it useful to use ping to measure how the delay evolves over time, after the iperf has started:
mininet> h1 ping -c 100 h2The Impact on the Short Flow
To see how our long-lived iperf flow affects our web page download, download the webpage again - while iperf is running. Write down how long it takes.
mininet> h2 wget http://10.0.0.1Why does the web page take so much longer to download?
Please write your explanation below. Answer:
PART 4: MEASURING THE REAL CWND AND BUFFER OCCUPANCY VALUES.
It turns out that Mininet lets you measure cwnd and buffer occupancy values. A script is provided to dump the values of cwnd and buffer occupancy into files. We’re going to re-run a couple of the experiments and plot the real values.
Restart Mininet
Stop and restart Mininet and the monitor script, then re-run the above experiment as follows.
mininet> exit
bash# sudo ./run.sh
Monitor TCP CWND and Buffer Occupancy in Mininet
In another bash terminal, go to cs144_bufferbloat directory and type the following giving a name for your experiment.
bash# ./monitor.sh <EXP_NAME>mininet> h1 ./iperf.sh mininet> h2 wget http://10.0.0.1
Wait for the wget to complete, then stop the python monitor script followed by the instructions on the screen. The cwnd values are saved in:
_tcpprobe.txt and the buffer occupancy in _sw0-qlen.txt.
Plot CWND and Queue Occupancy
Plot the TCP cwnd and queue occupancy from the output file
bash# ./plot_figures.sh <EXP_NAME>
The script will also host a webserver on the machine and you can use the url the script provided to access to your figures if it is a remote machine w/ public IP. Sample figures. If you are unable to see the cwnd, ensure you run wget after you started the monitor.sh script.
By now you will have realized that the buffer in the Headend router is so large that when it fills up with iperf packets, it delays the short wget flow. Next we’ll look at two ways to reduce the problem.
PART 5: MAKE THE ROUTER BUFFER SMALLER. REDUCE IT FROM 100 PACKETS TO 20 PACKETS.
Restart Mininet with small buffer
Stop any running Mininet and start Mininet again, but this time we will make the buffers 20 packets long instead:
prompt> sudo ./run-minq.sh prompt> sudo ./monitor.sh <EXP_NAME>Repeat the steps in Parts 2 and 3:
mininet> h2 wget http://10.0.0.1
mininet> h1 ping -c 10 h2
mininet> h1 ./iperf.sh
mininet> h1 ping -c 30 h2
mininet> h2 wget http://10.0.0.1
What do you think the cwnd and queue occupancy will be like in this case?
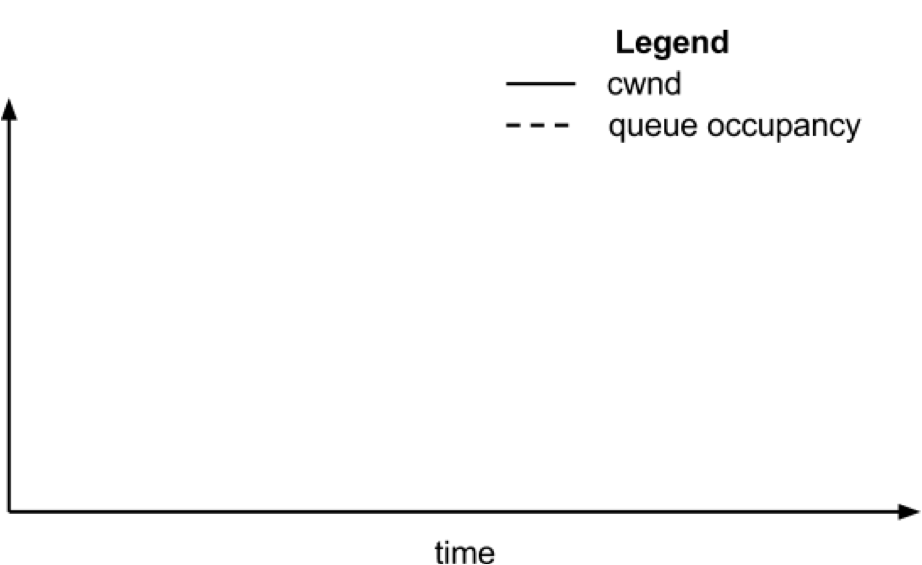
Plot CWND and Queue Occupancy
Plot the figure for cwnd and queue occupancy, this time using the script “./plot_figures_minq.sh”
prompt> ./plot_figures_minq.sh
Then again, use the url to see your figures.Sample figures
Why does reducing the queue size reduce the download time for wget?
Please put your explanation below. Answer:
DIFFERENT QUEUES
The problem seems to be that packets from the short flow are stuck behind a lot of packets from the long flow. What if we maintain a separate queue for each flow and then put iperf and wget traffic into different queues?
For this experiment, we put the iperf and wget/ping packets into separate queues in the Headend router. The scheduler implements fair queueing so that when both queues are busy, each flow will receive half of the bottleneck link rate.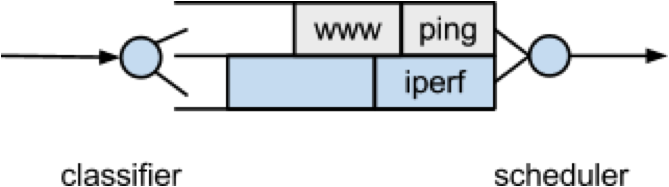
Restart Mininet
Start Mininet again, but this time we will create two queues, one for each type of traffic.
prompt> sudo ./run-diff.shRepeat the steps in Parts 2 and 3
mininet> h2 wget http://10.0.0.1
mininet> h1 ping -c 10 h2
mininet> h1 ./iperf.sh
mininet> h1 ping -c 30 h2
mininet> h2 wget http://10.0.0.1
Subscribe to:
Comments (Atom)