Saturday, August 2, 2014
Saturday, July 26, 2014
Ruby on Rails Tutorial - Learn Rails by Example, Michael Hartl
Contents
Chapter 1 From zero to deploy
1.1 Introduction
1.1.1 Comments for various readers1.1.2 “Scaling” Rails
1.1.3 Conventions in this book
1.2 Up and running
1.2.1 Development environments1.2.2 Ruby, RubyGems, Rails, and Git
1.2.3 The first application
1.2.4 Bundler
1.2.5 rails server
1.2.6 Model-view-controller (MVC)
1.3 Version control with Git
1.3.1 Installation and setup1.3.2 Adding and committing
1.3.3 What good does Git do you?
1.3.4 GitHub
1.3.5 Branch, edit, commit, merge
1.4 Deploying
1.4.1 Heroku setup1.4.2 Heroku deployment, step one
1.4.3 Heroku deployment, step two
1.4.4 Heroku commands
Chapter 2 A demo app
2.1 Planning the application
2.1.1 Modeling demo users
2.1.2 Modeling demo microposts
2.2 The Users resource
2.2.1 A user tour
2.2.2 MVC in action
2.2.3 Weaknesses of this Users resource
2.3 The Microposts resource
2.3.1 A micropost microtour
2.3.2 Putting the micro in microposts
2.3.3 A user has_many microposts
2.3.4 Inheritance hierarchies
2.3.5 Deploying the demo app
2.4 Conclusion
Chapter 3 Mostly static pages
3.1 Static pages
3.2 Our first tests
3.2.1 Test-driven development
3.2.2 Adding a page
3.3 Slightly dynamic pages
3.3.1 Testing a title change
3.3.2 Passing title tests
3.3.3 Embedded Ruby
3.3.4 Eliminating duplication with layouts
3.4 Conclusion
3.5 Exercises
3.6 Advanced setup
3.6.1 Eliminating bundle exec
3.6.2 Automated tests with Guard
3.6.3 Speeding up tests with Spork
3.6.4 Tests inside Sublime Text
Chapter 4 Rails-flavored Ruby
4.1 Motivation
4.2 Strings and methods
4.2.1 Comments
4.2.2 Strings
4.2.3 Objects and message passing
4.2.4 Method definitions
4.2.5 Back to the title helper
4.3 Other data structures
4.3.1 Arrays and ranges
4.3.2 Blocks
4.3.3 Hashes and symbols
4.3.4 CSS revisited
4.4 Ruby classes
4.4.1 Constructors
4.4.2 Class inheritance
4.4.3 Modifying built-in classes
4.4.4 A controller class
4.4.5 A user class
4.5 Conclusion
4.6 Exercises
Chapter 5 Filling in the layout
5.1 Adding some structure
5.1.1 Site navigation
5.1.2 Bootstrap and custom CSS
5.1.3 Partials
5.2 Sass and the asset pipeline
5.2.1 The asset pipeline
5.2.2 Syntactically awesome stylesheets
5.3 Layout links
5.3.1 Route tests
5.3.2 Rails routes
5.3.3 Named routes
5.3.4 Pretty RSpec
5.4 User signup: A first step
5.4.1 Users controller
5.4.2 Signup URL
5.5 Conclusion
5.6 Exercises
Chapter 6 Modeling users
6.1 User model
6.1.1 Database migrations
6.1.2 The model file
6.1.3 Creating user objects
6.1.4 Finding user objects
6.1.5 Updating user objects
6.2 User validations
6.2.1 Initial user tests
6.2.2 Validating presence
6.2.3 Length validation
6.2.4 Format validation
6.2.5 Uniqueness validation
6.3 Adding a secure password
6.3.1 A hashed password
6.3.2 Password and confirmation
6.3.3 User authentication
6.3.4 User has secure password
6.3.5 Creating a user
6.4 Conclusion
6.5 Exercises
Chapter 7 Sign up
7.1 Showing users
7.1.1 Debug and Rails environments
7.1.2 A Users resource
7.1.3 Testing the user show page (with factories)
7.1.4 A Gravatar image and a sidebar
7.2 Signup form
7.2.1 Tests for user signup
7.2.2 Using form_for
7.2.3 The form HTML
7.3 Signup failure
7.3.1 A working form
7.3.2 Strong parameters
7.3.3 Signup error messages
7.4 Signup success
7.4.1 The finished signup form
7.4.2 The flash
7.4.3 The first signup
7.4.4 Deploying to production with SSL
7.5 Conclusion
7.6 Exercises
Chapter 8 Sign in, sign out
8.1 Sessions and signin failure
8.1.1 Sessions controller
8.1.2 Signin tests
8.1.3 Signin form
8.1.4 Reviewing form submission
8.1.5 Rendering with a flash message
8.2 Signin success
8.2.1 Remember me
8.2.2 A working sign_in method
8.2.3 Current user
8.2.4 Changing the layout links
8.2.5 Signin upon signup
8.2.6 Signing out
8.3 Introduction to cucumber (optional)
8.3.1 Installation and setup
8.3.2 Features and steps
8.3.3 Counterpoint: RSpec custom matchers
8.4 Conclusion
8.5 Exercises
Chapter 9 Updating, showing, and deleting users
9.1 Updating users
9.1.1 Edit form
9.1.2 Unsuccessful edits
9.1.3 Successful edits
9.2 Authorization
9.2.1 Requiring signed-in users
9.2.2 Requiring the right user
9.2.3 Friendly forwarding
9.3 Showing all users
9.3.1 User index
9.3.2 Sample users
9.3.3 Pagination
9.3.4 Partial refactoring
9.4 Deleting users
9.4.1 Administrative users
9.4.2 The destroy action
9.5 Conclusion
9.6 Exercises
Chapter 10 User microposts
10.1 A Micropost model
10.1.1 The basic model
10.1.2 The first validation
10.1.3 User/Micropost associations
10.1.4 Micropost refinements
10.1.5 Content validations
10.2 Showing microposts
10.2.1 Augmenting the user show page
10.2.2 Sample microposts
10.3 Manipulating microposts
10.3.1 Access control
10.3.2 Creating microposts
10.3.3 A proto-feed
10.3.4 Destroying microposts
10.4 Conclusion
10.5 Exercises
Chapter 11 Following users
11.1 The Relationship model
11.1.1 A problem with the data model (and a solution)
11.1.2 User/relationship associations
11.1.3 Validations
11.1.4 Followed users
11.1.5 Followers
11.2 A web interface for following users
11.2.1 Sample following data
11.2.2 Stats and a follow form
11.2.3 Following and followers pages
11.2.4 A working follow button the standard way
11.2.5 A working follow button with Ajax
11.3 The status feed
11.3.1 Motivation and strategy
11.3.2 A first feed implementation
11.3.3 Subselects
11.3.4 The new status feed
11.4 Conclusion
11.4.1 Extensions to the sample application
11.4.2 Guide to further resources
11.5 Exercises
Saturday, March 29, 2014
BufferBloat
INTRODUCTION
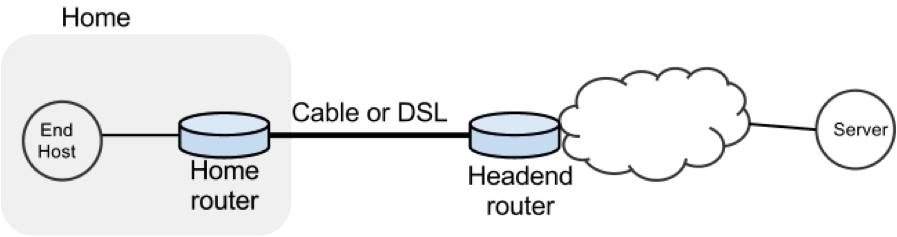
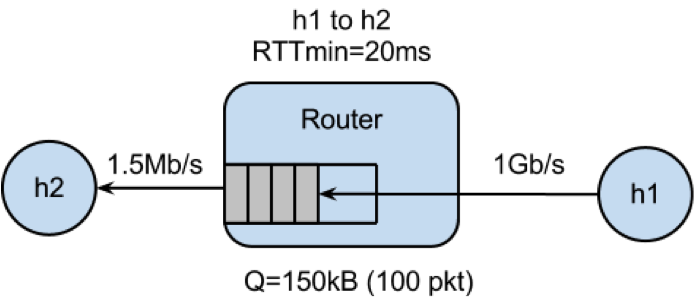
In this exercise we will study the dynamics of TCP in home networks. Take a look at the figure below which shows a “typical” home network with a Home Router connected to an end host. The Home Router is connected via Cable or DSL to a Headend router at the Internet access provider’s office. We are going to study what happens when we download data from a remote server to the End Host in this home network.
In a real network it’s hard to measure cwnd (because it’s private to the Server) and the buffer occupancy (because it’s private to the router). To make our measurement job easier, we are going to emulate the network in Mininet (See Environment Setup for setting up the environment).
The goals of the exercise are to:
- Learn first-hand the dynamics of cwnd and buffer occupancy in a “real” network.
- Learn why large router buffers can lead to poor performance in home networks. This problem is often called “Buffer Bloat.”
- Learn how to use Mininet so you can repeat or extend the experiments in your own time.
PART 1: GET MININET UP AND RUNNING
Get the Bufferbloat Topology
The bufferbloat topology is in svn under the hw8 directory.
Run the Mininet Emulator
> cd cs144_bufferbloat/
> sudo ./run.sh
Measure the Delay Between the Two Hosts
After Mininet is running, you can measure the delay from H1 to H2 with the command: mininet> h1 ping -c 10 h2
PART 2: WEB PAGE DOWNLOAD - SKETCH THE TCP CWND
Measure how long it takes to download a web page from H1
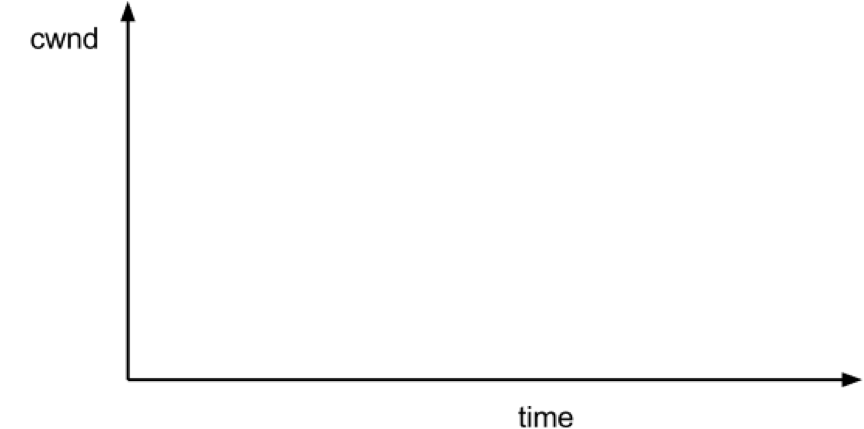
mininet> h2 wget http://10.0.0.1Sketch how you think cwnd evolves over time at H1. Mark multiples of RTT on the x-axis.
PART 3: “STREAMING VIDEO” - SKETCH THE TCP CWND AND BUFFER OCCUPANCY.
Create the Video Flow
To see how the dynamics of a long flow (which enters the AIMD phase) differs from a short flow (which never leaves slow-start), we are going to repeat Part 2 for a “streaming video flow”. Instead of actually watching videos on your machine, we are going to set up a long-lived high speed TCP connection instead, to emulate a long-lived video flow. You can generate long flows using the iperf command, and we have wrapped it in a script which you can run as follows:
mininet> h1 ./iperf.sh
You can see the throughput of TCP flow from H1 to H2 by running:
mininet> h2 tail -f ./iperf-recv.txt The TCP CWND of the Video Flow
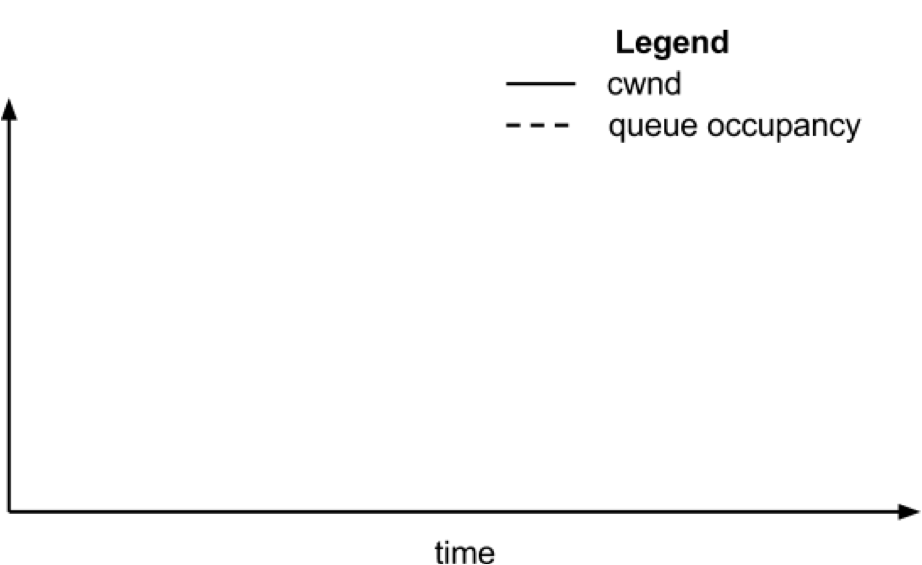
Sketch how you think cwnd evolves over time at H1. You might find it useful to use ping to measure how the delay evolves over time, after the iperf has started:
mininet> h1 ping -c 100 h2The Impact on the Short Flow
To see how our long-lived iperf flow affects our web page download, download the webpage again - while iperf is running. Write down how long it takes.
mininet> h2 wget http://10.0.0.1Why does the web page take so much longer to download?
Please write your explanation below. Answer:
PART 4: MEASURING THE REAL CWND AND BUFFER OCCUPANCY VALUES.
It turns out that Mininet lets you measure cwnd and buffer occupancy values. A script is provided to dump the values of cwnd and buffer occupancy into files. We’re going to re-run a couple of the experiments and plot the real values.
Restart Mininet
Stop and restart Mininet and the monitor script, then re-run the above experiment as follows.
mininet> exit
bash# sudo ./run.sh
Monitor TCP CWND and Buffer Occupancy in Mininet
In another bash terminal, go to cs144_bufferbloat directory and type the following giving a name for your experiment.
bash# ./monitor.sh <EXP_NAME>mininet> h1 ./iperf.sh mininet> h2 wget http://10.0.0.1
Wait for the wget to complete, then stop the python monitor script followed by the instructions on the screen. The cwnd values are saved in:
_tcpprobe.txt and the buffer occupancy in _sw0-qlen.txt.
Plot CWND and Queue Occupancy
Plot the TCP cwnd and queue occupancy from the output file
bash# ./plot_figures.sh <EXP_NAME>
The script will also host a webserver on the machine and you can use the url the script provided to access to your figures if it is a remote machine w/ public IP. Sample figures. If you are unable to see the cwnd, ensure you run wget after you started the monitor.sh script.
By now you will have realized that the buffer in the Headend router is so large that when it fills up with iperf packets, it delays the short wget flow. Next we’ll look at two ways to reduce the problem.
PART 5: MAKE THE ROUTER BUFFER SMALLER. REDUCE IT FROM 100 PACKETS TO 20 PACKETS.
Restart Mininet with small buffer
Stop any running Mininet and start Mininet again, but this time we will make the buffers 20 packets long instead:
prompt> sudo ./run-minq.sh prompt> sudo ./monitor.sh <EXP_NAME>Repeat the steps in Parts 2 and 3:
mininet> h2 wget http://10.0.0.1
mininet> h1 ping -c 10 h2
mininet> h1 ./iperf.sh
mininet> h1 ping -c 30 h2
mininet> h2 wget http://10.0.0.1
What do you think the cwnd and queue occupancy will be like in this case?
Plot CWND and Queue Occupancy
Plot the figure for cwnd and queue occupancy, this time using the script “./plot_figures_minq.sh”
prompt> ./plot_figures_minq.sh
Then again, use the url to see your figures.Sample figures
Why does reducing the queue size reduce the download time for wget?
Please put your explanation below. Answer:
DIFFERENT QUEUES
The problem seems to be that packets from the short flow are stuck behind a lot of packets from the long flow. What if we maintain a separate queue for each flow and then put iperf and wget traffic into different queues?
For this experiment, we put the iperf and wget/ping packets into separate queues in the Headend router. The scheduler implements fair queueing so that when both queues are busy, each flow will receive half of the bottleneck link rate.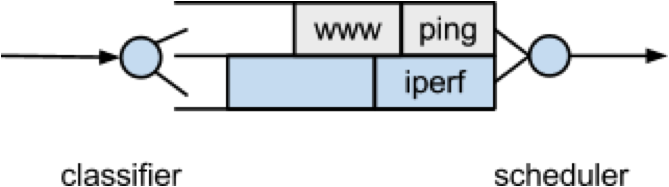
Restart Mininet
Start Mininet again, but this time we will create two queues, one for each type of traffic.
prompt> sudo ./run-diff.shRepeat the steps in Parts 2 and 3
mininet> h2 wget http://10.0.0.1
mininet> h1 ping -c 10 h2
mininet> h1 ./iperf.sh
mininet> h1 ping -c 30 h2
mininet> h2 wget http://10.0.0.1
Tuesday, March 25, 2014
2
-Others while we debug.

That is very weird.  Could you modify the DCTCP script to spawn the CLI just before the experiment starts, so you can check whether the "red" qdisc is actually getting installed?

thanks,
--
Vimal

************************************************************************************************
The red queue on the switch, right? The one on h1 looked similar. Both
showed 0 for dropped, overlimits, and marked. Shouldn't it be non-zero
afterwards?

before

qdisc red 6: dev s1-eth1 parent 5:1 limit 1000000b min 30000b max 35000b ecn
 Sent 1446 bytes 19 pkt (dropped 0, overlimits 0 requeues 0)
 backlog 0b 0p requeues 0
  marked 0 early 0 pdrop 0 other 0

after

qdisc red 6: dev s1-eth1 parent 5:1 limit 1000000b min 30000b max 35000b ecn
 Sent 1594 bytes 21 pkt (dropped 0, overlimits 0 requeues 0)
 backlog 0b 0p requeues 0
  marked 0 early 0 pdrop 0 other 0


Full output:

shewa@h0:~/src/mininet_tests/dctcp$ ./run-dctcp.sh
net.ipv4.tcp_dctcp_enable = 0
net.ipv4.tcp_ecn = 0
net.ipv4.tcp_dctcp_enable = 1
net.ipv4.tcp_ecn = 1
~~~~~~~~~~~~~~~~~> BW = 100.0
*** Creating network
*** Adding controller
*** Adding hosts:
h1 h2 h3
*** Adding switches:
s1
*** Adding links:
(100.00Mbit ECN) (100.00Mbit ECN) (h1, s1) (100.00Mbit 0.075ms  0.05ms
distribution normal   delay) (100.00Mbit 0.075ms  0.05ms distribution
normal   delay) (h2, s1) (100.00Mbit 0.075ms  0.05ms distribution
normal   delay) (100.00Mbit 0.075ms  0.05ms distribution normal
delay) (h3, s1)
*** Configuring hosts
h1 (cfs -1/100000us) h2 (cfs -1/100000us) h3 (cfs -1/100000us)
*** Starting controller
*** Starting 1 switches
s1 (100.00Mbit ECN) (100.00Mbit 0.075ms  0.05ms distribution normal
delay) (100.00Mbit 0.075ms  0.05ms distribution normal   delay)
PING 10.0.0.2 (10.0.0.2) 56(84) bytes of data.
64 bytes from 10.0.0.2: icmp_req=1 ttl=64 time=2.40 ms
64 bytes from 10.0.0.2: icmp_req=2 ttl=64 time=1.07 ms

--- 10.0.0.2 ping statistics ---
2 packets transmitted, 2 received, 0% packet loss, time 1001ms
rtt min/avg/max/mdev = 1.075/1.741/2.408/0.667 ms

*** Starting CLI:
mininet> s1 tc -s qdisc
qdisc mq 0: dev eth0 root
 Sent 830689151 bytes 682384 pkt (dropped 0, overlimits 0 requeues 0)
 backlog 0b 0p requeues 0
qdisc mq 0: dev eth1 root
 Sent 670 bytes 5 pkt (dropped 0, overlimits 0 requeues 0)
 backlog 0b 0p requeues 0
qdisc htb 5: dev s1-eth1 root refcnt 2 r2q 10 default 1 direct_packets_stat 0
 Sent 1446 bytes 19 pkt (dropped 0, overlimits 0 requeues 0)
 backlog 0b 0p requeues 0
qdisc red 6: dev s1-eth1 parent 5:1 limit 1000000b min 30000b max 35000b ecn
 Sent 1446 bytes 19 pkt (dropped 0, overlimits 0 requeues 0)
 backlog 0b 0p requeues 0
  marked 0 early 0 pdrop 0 other 0
qdisc netem 10: dev s1-eth1 parent 6: limit 425
 Sent 1446 bytes 19 pkt (dropped 0, overlimits 0 requeues 0)
 backlog 0b 0p requeues 0
qdisc htb 5: dev s1-eth2 root refcnt 2 r2q 10 default 1 direct_packets_stat 0
 Sent 1458 bytes 19 pkt (dropped 0, overlimits 17 requeues 0)
 backlog 0b 0p requeues 0
qdisc netem 10: dev s1-eth2 parent 5:1 limit 1000000 delay 74us  49us
 Sent 1458 bytes 19 pkt (dropped 0, overlimits 0 requeues 0)
 backlog 0b 0p requeues 0
qdisc htb 5: dev s1-eth3 root refcnt 2 r2q 10 default 1 direct_packets_stat 0
 Sent 1154 bytes 15 pkt (dropped 0, overlimits 14 requeues 0)
 backlog 0b 0p requeues 0
qdisc netem 10: dev s1-eth3 parent 5:1 limit 1000000 delay 74us  49us
 Sent 1154 bytes 15 pkt (dropped 0, overlimits 0 requeues 0)
 backlog 0b 0p requeues 0
mininet> quit
     1 seconds left

*** Starting CLI:
mininet> s1 tc -s qdisc
qdisc mq 0: dev eth0 root
 Sent 850160497 bytes 700768 pkt (dropped 0, overlimits 0 requeues 0)
 backlog 0b 0p requeues 0
qdisc mq 0: dev eth1 root
 Sent 670 bytes 5 pkt (dropped 0, overlimits 0 requeues 0)
 backlog 0b 0p requeues 0
qdisc htb 5: dev s1-eth1 root refcnt 2 r2q 10 default 1 direct_packets_stat 0
 Sent 1594 bytes 21 pkt (dropped 0, overlimits 0 requeues 0)
 backlog 0b 0p requeues 0
qdisc red 6: dev s1-eth1 parent 5:1 limit 1000000b min 30000b max 35000b ecn
 Sent 1594 bytes 21 pkt (dropped 0, overlimits 0 requeues 0)
 backlog 0b 0p requeues 0
  marked 0 early 0 pdrop 0 other 0
qdisc netem 10: dev s1-eth1 parent 6: limit 425
 Sent 1594 bytes 21 pkt (dropped 0, overlimits 0 requeues 0)
 backlog 0b 0p requeues 0
qdisc htb 5: dev s1-eth2 root refcnt 2 r2q 10 default 1 direct_packets_stat 0
 Sent 1512 bytes 20 pkt (dropped 0, overlimits 18 requeues 0)
 backlog 0b 0p requeues 0
qdisc netem 10: dev s1-eth2 parent 5:1 limit 1000000 delay 74us  49us
 Sent 1512 bytes 20 pkt (dropped 0, overlimits 0 requeues 0)
 backlog 0b 0p requeues 0
qdisc htb 5: dev s1-eth3 root refcnt 2 r2q 10 default 1 direct_packets_stat 0
 Sent 1282 bytes 17 pkt (dropped 0, overlimits 16 requeues 0)
 backlog 0b 0p requeues 0
qdisc netem 10: dev s1-eth3 parent 5:1 limit 1000000 delay 74us  49us
 Sent 1282 bytes 17 pkt (dropped 0, overlimits 0 requeues 0)
 backlog 0b 0p requeues 0
************************************************************************************************
Forget dropped/overlimits -- from your output before/after the experiment it seems like most of the bytes were sent out of eth0.  Are you sure TCP is even senidng data on the right interfaces?  Can you check the throughput during the experiment?

ethstats is a nice tool (sudo apt-get install ethstats; ethstats -n1)

--
Vimal
************************************************************************************************
Yes.

The bwm-ng monitoring graph shows 100Mbps over s1-eth1. I turned
bwm-ng off and monitored with ethstats (apparently they can't both run
simultaneously) and it agrees.

$ ethstats -n1 &> /tmp/ethstats.txt
$ cat /tmp/ethstats.txt | grep s1-eth1 | sort | uniq -c
      1   s1-eth1:    0.00 Mb/s In     0.00 Mb/s Out - 4293979006.0
p/s In  4293977900.0 p/s Out
      1   s1-eth1:    0.00 Mb/s In     0.00 Mb/s Out - 4293987295.0
p/s In  4293986192.0 p/s Out
      1   s1-eth1:    0.00 Mb/s In     0.00 Mb/s Out - 4294959007.0
p/s In  4294959004.0 p/s Out
      1   s1-eth1:    0.00 Mb/s In     0.00 Mb/s Out - 980001.0 p/s In
 981104.0 p/s Out
      1   s1-eth1:    4.86 Mb/s In   100.29 Mb/s Out -   8241.0 p/s In
   8287.0 p/s Out
      1   s1-eth1:    4.86 Mb/s In   100.30 Mb/s Out -   8261.0 p/s In
   8297.0 p/s Out
...

Since bwm-ng and ethstats conflicted, I assume that so does 'tc -s
qdisc' ... so I reran with just it.
Now it shows the traffic going through s1-eth1 and the red queue. But
it still doesn't show any
marked packets. HTB shows overlimits for each switch interface, but I
don't see anything else.

before:

qdisc mq 0: dev eth0 root
 Sent 365727120 bytes 290930 pkt (dropped 0, overlimits 0 requeues 1)
 backlog 0b 0p requeues 1
qdisc mq 0: dev eth1 root
 Sent 1012 bytes 6 pkt (dropped 0, overlimits 0 requeues 0)
 backlog 0b 0p requeues 0
qdisc htb 5: dev s1-eth1 root refcnt 2 r2q 10 default 1 direct_packets_stat 0
 Sent 702 bytes 9 pkt (dropped 0, overlimits 0 requeues 0)
 backlog 0b 0p requeues 0
qdisc red 6: dev s1-eth1 parent 5:1 limit 1000000b min 30000b max 35000b ecn
 Sent 702 bytes 9 pkt (dropped 0, overlimits 0 requeues 0)
 backlog 0b 0p requeues 0
  marked 0 early 0 pdrop 0 other 0
qdisc netem 10: dev s1-eth1 parent 6: limit 425
 Sent 702 bytes 9 pkt (dropped 0, overlimits 0 requeues 0)
 backlog 0b 0p requeues 0
qdisc htb 5: dev s1-eth2 root refcnt 2 r2q 10 default 1 direct_packets_stat 0
 Sent 620 bytes 8 pkt (dropped 0, overlimits 7 requeues 0)
 backlog 0b 0p requeues 0
qdisc netem 10: dev s1-eth2 parent 5:1 limit 1000000 delay 74us  49us
 Sent 620 bytes 8 pkt (dropped 0, overlimits 0 requeues 0)
 backlog 0b 0p requeues 0
qdisc htb 5: dev s1-eth3 root refcnt 2 r2q 10 default 1 direct_packets_stat 0
 Sent 316 bytes 4 pkt (dropped 0, overlimits 4 requeues 0)
 backlog 0b 0p requeues 0
qdisc netem 10: dev s1-eth3 parent 5:1 limit 1000000 delay 74us  49us
 Sent 316 bytes 4 pkt (dropped 0, overlimits 0 requeues 0)
 backlog 0b 0p requeues 0

after:

qdisc mq 0: dev eth0 root
 Sent 483556337 bytes 377972 pkt (dropped 0, overlimits 0 requeues 1)
 backlog 0b 0p requeues 1
qdisc mq 0: dev eth1 root
 Sent 1012 bytes 6 pkt (dropped 0, overlimits 0 requeues 0)
 backlog 0b 0p requeues 0
qdisc htb 5: dev s1-eth1 root refcnt 2 r2q 10 default 1 direct_packets_stat 0
 Sent 1502786766 bytes 993579 pkt (dropped 0, overlimits 1953808 requeues 0)
 backlog 0b 0p requeues 0
qdisc red 6: dev s1-eth1 parent 5:1 limit 1000000b min 30000b max 35000b ecn
 Sent 1502786766 bytes 993579 pkt (dropped 0, overlimits 0 requeues 0)
 backlog 0b 0p requeues 0
  marked 0 early 0 pdrop 0 other 0
qdisc netem 10: dev s1-eth1 parent 6: limit 425
 Sent 1502786766 bytes 993579 pkt (dropped 0, overlimits 0 requeues 0)
 backlog 0b 0p requeues 0
qdisc htb 5: dev s1-eth2 root refcnt 2 r2q 10 default 1 direct_packets_stat 0
 Sent 36634038 bytes 492727 pkt (dropped 0, overlimits 562072 requeues 0)
 backlog 0b 0p requeues 0
qdisc netem 10: dev s1-eth2 parent 5:1 limit 1000000 delay 74us  49us
 Sent 36634038 bytes 492727 pkt (dropped 0, overlimits 0 requeues 0)
 backlog 0b 0p requeues 0
qdisc htb 5: dev s1-eth3 root refcnt 2 r2q 10 default 1 direct_packets_stat 0
 Sent 37156074 bytes 499835 pkt (dropped 0, overlimits 568936 requeues 0)
 backlog 0b 0p requeues 0
qdisc netem 10: dev s1-eth3 parent 5:1 limit 1000000 delay 74us  49us
 Sent 37156074 bytes 499835 pkt (dropped 0, overlimits 0 requeues 0)
 backlog 0b 0p requeues 0


-- Andrew Shewmaker
************************************************************************************************
Thanks!   Looking at the queue sizes and the cwnd plots, it seems like DCTCP is working.  The graph with TCP would look very different with pronounced sawtooths.

Can you confirm that the RED queue does ECN marking by doing a tcpdump at s1-eth1 and checking for ECN marked packets (tcpdump -ni s1-eth1 'ip && (ip[1]&0x3==0x3)'?   I am guessing the bug is that RED isn't reporting stats correctly....

bwm-ng and ethstats read /proc/net/dev to report stats.  tc doesn't use that interface, so you can run it with the other tools.  Though I wonder why bwm-ng and ethstats lock /proc/net/dev....

--
Vimal
************************************************************************************************
I ran the tcpdump outside of mininet and didn't see anything.

I added the above tcpdump to dctcp.py to run alongside the others
already built into the script for the hosts, and I'm getting an empty
pcap file for the switch and none for the hosts. I checked stderr in
their Popen objects and they're all getting:

setns: Bad address

I didn't see that error (or anything useful) when I executed by hand in mininet:

mininet> s1 tcpdump -ni s1-eth1 'ip && (ip[1]&0x3==0x3)'

I'm still looking into that error message.


-- Andrew Shewmaker
************************************************************************************************
Hmm, could you see what tcpdump -ni s1-eth1 'ip && (ip[1]&0x3==0x2)' outputs?  This checks for ECN capable packets that are not ECN marked.  You needn't have to run it inside Mininet -- it should work in the root namespace as well.

--
Vimal


************************************************************************************************
It looks like everything is ECN capable, but no ECN markings.

shewa@h0:~/src/mininet_tests/dctcp$ uname -r; sudo tcpdump -ni s1-eth1
-s0 -w /tmp/s1-eth1.pcap
3.2.18dctcp3
tcpdump: WARNING: s1-eth1: no IPv4 address assigned
tcpdump: listening on s1-eth1, link-type EN10MB (Ethernet), capture
size 65535 bytes
tcpdump: pcap_loop: The interface went down
1733228 packets captured
1969960 packets received by filter
236683 packets dropped by kernel

shewa@h0:~/src/mininet_tests/dctcp$ sudo tcpdump -n -r
/tmp/s1-eth1.pcap 'ip && (ip[1]&0x3==0x3)'
reading from file /tmp/s1-eth1.pcap, link-type EN10MB (Ethernet)

shewa@h0:~/src/mininet_tests/dctcp$ sudo tcpdump -n -r
/tmp/s1-eth1.pcap 'ip && (ip[1]&0x3==0x2)'
...
many, many lines
...
10:27:03.377120 IP 10.0.0.2.60928 > 10.0.0.1.5001: Flags [.], seq
594378104:594379552, ack 1, win 29, options [nop,nop,TS val 804230 ecr
804229], length 1448
10:27:03.377148 IP 10.0.0.1.5001 > 10.0.0.2.60928: Flags [.], ack
594382448, win 1076, options [nop,nop,TS val 804268 ecr 804230],
length 0
10:27:03.377241 IP 10.0.0.2.60928 > 10.0.0.1.5001: Flags [.], seq
594382448:594383896, ack 1, win 29, options [nop,nop,TS val 804230 ecr
804229], length 1448
10:27:03.377285 IP 10.0.0.1.5001 > 10.0.0.2.60928: Flags [.], ack
594383896, win 1076, options [nop,nop,TS val 804268 ecr 804230],
length 0
10:27:03.377362 IP 10.0.0.2.60928 > 10.0.0.1.5001: Flags [P.], seq
594383896:594384008, ack 1, win 29, options [nop,nop,TS val 804230 ecr
804229], length 112
10:27:03.377371 IP 10.0.0.2.60928 > 10.0.0.1.5001: Flags [F.], seq
594384008, ack 1, win 29, options [nop,nop,TS val 804232 ecr 804231],
length 0
10:27:03.383468 IP 10.0.0.1.5001 > 10.0.0.2.60928: Flags [F.], seq 1,
ack 594384009, win 1076, options [nop,nop,TS val 804275 ecr 804232],
length 0
10:27:03.383506 IP 10.0.0.1.5001 > 10.0.0.3.43140: Flags [F.], seq 0,
ack 838574850, win 1726, options [nop,nop,TS val 804275 ecr 804225],
length 0
10:27:03.383633 IP 10.0.0.2.60928 > 10.0.0.1.5001: Flags [.], ack 2,
win 29, options [nop,nop,TS val 804275 ecr 804275], length 0
10:27:03.383680 IP 10.0.0.3.43140 > 10.0.0.1.5001: Flags [.], ack 1,
win 29, options [nop,nop,TS val 804275 ecr 804275], length 0


************************************************************************************************
Hmm, that is very weird.

OK, let's try something else.  Here is a modified htb module that does ECN marking:
http://stanford.edu/~jvimal/htb-ecn/

You might have to:
* edit the experiment script to remove RED qdisc from being added
* rmmod sch_htb before running any experiment
* download the two files from the link above and type "make" to create a new sch_htb.ko module
* insmod /path/to/new/sch_htb.ko ecn_thresh_packets=30
* make sure the expt script doesn't do "rmmod sch_htb"...  if so, comment it out
* rerun the experiments, checking for ECN marks both on both s1-eth1 as well as the host that receives the two flows (mininet> hN tcpdump ... hN-eth0 'ip &&...' )

And see what happens.  Since the queue occupancy output suggests that it is greater than 300, packets must be marked....

--
Vimal

************************************************************************************************

That worked. Thanks!

My tcpdump on s1-eth1 sees ECN marked packets and the bottleneck queue
length is mostly between 23 and 32 packets. 50MB/s per flow.

I wonder why red isn't working on any of the systems I tested, but I
suppose the main thing is that your htb module does.

Again, thank you so much.

Andrew

************************************************************************************************
+Others.

Glad it worked.

@all: It appears the DCTCP bug was due the RED module
not ECN marking packets.  A custom htb module that did
ECN marking seems to have resolved the issue.

Andrew: Here is a pointer if you want to further debug
this:

1. Look at the red_enqueue function: http://lxr.free-electrons.com/source/net/sched/sch_red.c?v=3.2#L57

2. Line 74 does the ECN marking but it's conditioned on a few cases.  It's worth checking if those conditions are triggered.

And, here is a patch to modify sch_htb.c from any recent
kernel.  It's worth keeping it safe somewhere since my
webpage might not be around forever.

@@ -39,6 +39,7 @@
 #include <linux/slab.h>
 #include <net/netlink.h>
 #include <net/pkt_sched.h>
+#include <net/inet_ecn.h>

 /* HTB algorithm.
     Author: devik@cdi.cz
@@ -64,6 +65,10 @@
 module_param    (htb_hysteresis, int, 0640);
 MODULE_PARM_DESC(htb_hysteresis, "Hysteresis mode, less CPU load, less accurate");

+static int ecn_thresh_packets __read_mostly = 0; /* 0 disables it */
+module_param(ecn_thresh_packets, int, 0640);
+MODULE_PARM_DESC(ecn_thresh_packets, "ECN marking threshold in packets");
+
 /* used internaly to keep status of single class */
 enum htb_cmode {
  HTB_CANT_SEND,  /* class can't send and can't borrow */
@@ -552,6 +557,9 @@
  struct htb_sched *q = qdisc_priv(sch);
  struct htb_class *cl = htb_classify(skb, sch, &ret);

+ if (ecn_thresh_packets && (sch->q.qlen >= ecn_thresh_packets))
+  INET_ECN_set_ce(skb);
+
  if (cl == HTB_DIRECT) {
   /* enqueue to helper queue */
   if (q->direct_queue.qlen < q->direct_qlen) {

--
Vimal
************************************************************************************************
Thanks, Vimal! I'll let you know if I fix a bug.

-- Andrew Shewmaker
************************************************************************************************

************************************************************************************************
Monday, March 24, 2014
1
Hi, First, great job on Mininet. It's a wonderful tool, and I think replicating the results of CS papers is extremely important. Second, I've been having trouble replicating the dctcp experiments, as described in http://reproducingnetworkresearch.wordpress.com/2012/06/09/dctcp-2/ With 3.2 and 3.2.54 kernels, it doesn't appear as if the ECN marking is occuring. The bottleneck queue length has the same oscillation between 200 and 425 packets for reno, reno+ecn, and dctcp. I added an execution of 'tc -s qdisc' on the switch at the end of dctcp.py and it confirms that no packets are being marked. The behavior improves somewhat with a 3.6 kernel (the patch required little modification up to that point in the series). At this point I see reno+ecn working to keep the bottleneck queue length below 30 packets. But dctcp still doesn't appear to work even though stats show the switch is marking packets. I have also uncommented the printks marking the transition between CE=0 and CE=1 states in the ACK generation state machine, but see nothing in dmesg. Do you have any insights into what might be going wrong? Sometimes I worry that my laptop isn't fast enough, but see below. Thank you for any information you might share, Andrew Shewmaker My laptop specs are: 2GHz 8-core i7 laptop w/ 8GB RAM Fedora 18 custom 3.2, 3.2.54, and 3.6 kernels + dctcp patch openvswitch 2.0 mininet from git 'sudo mn --test=iperf' yields: 550+ Mbps on 3.2.x 750+ Mbps on 3.6 10+ Gbps on 3.10+ (tso on) 1+ Gbps on 3.10+ (tso off, gso on) 550+ Mbps on 3.10+ (tso/gso off) 'sudo mn --link=tc,bw=100 --test=iperf' yields 78+ Mbps on 3.2.x 90+ Mbps on 3.10+ And those rates decrease again for the dctcp.py experiment: 7-16 Mbps on 3.2.x 20-30 Mbps on 3.6+ These don't seem fast enough to cause congestion, but the bottleneck queue length zigzags between 200 and 425 packets, and I see the regular reno cwnd response.-- Andrew Shewmaker
Friday, March 14, 2014
rtnetlink - Linux IPv4 routing socket
netem - network emulator
http://www.linuxfoundation.org/collaborate/workgroups/networking/netem
Monday, March 3, 2014
nohup Execute Commands After You Exit From a Shell Prompt
aaaMost of the time you login into remote server via ssh. If you start a shell script or command and you exit (abort remote connection), the process / command will get killed. Sometime job or command takes a long time. If you are not sure when the job will finish, then it is better to leave job running in background. But, if you log out of the system, the job will be stopped and terminated by your shell. What do you do to keep job running in the background when process gets SIGHUP?
Say hello to nohup command
The answer is simple, use nohup command line-utility which allows to run command/process or shell script that can continue running in the background after you log out from a shell:
nohup command syntax:
The syntax is as follows
OR
nohup command-name &OR
nohup /path/to/command-name arg1 arg2 &http://www.cyberciti.biz/tips/nohup-execute-commands-after-you-exit-from-a-shell-prompt.htmlHow do I unzip a tar gz archive to a specific destination?
ou have two choices:
cd /root/Desktop/folder
tar zxf /root/Documents/file.tar.gz
or
tar zxf file.tar.gz -C /root/Desktop/folderFriday, February 28, 2014
Thursday, February 27, 2014
How Does It Really Work? (optional: for the curious)
The magic behind Mininet’s illusion is a set of features built into Linux that allow a single system to be split into a bunch of smaller “containers”, each with a fixed share of the processing power, combined with virtual link code that allows links with accurate delays and speeds.
Internally, Mininet employs lightweight virtualization features in the Linux kernel, including process groups, CPU bandwidth isolation, and network namespaces, and combines them with link schedulers and virtual Ethernet links. These features yield a system that starts faster and scales to more hosts than emulators which use full virtual machines.
A Mininet network consists of the following components:
Isolated Hosts. An emulated host in Mininet is a group of user-level processes moved into a network namespace - a container for network state. Network namespaces provide process groups with exclusive ownership of interfaces, ports, and routing tables (such as ARP and IP). For example, two web servers in two network namespaces can coexist on one system, both listening to private eth0 interfaces on port 80. Mininet uses CPU Bandwidth Limiting to limit the fraction of a CPU available to each process group.
Emulated Links. The data rate of each link is enforced by Linux Traffic Control (tc), which has a number of packet schedulers to shape traffic to a configured rate. Each emulated host has its own virtual Ethernet interface(s) (created and installed with ip link add/set). A virtual Ethernet (or veth) pair, acts like a wire connecting two virtual interfaces, or virtual switch ports; packets sent through one interface are delivered to the other, and each interface appears as a fully functional Ethernet port to all system and application software.
Emulated Switches. Mininet typically uses the default Linux bridge or Open vSwitch running in kernel mode to switch packets across interfaces. Switches and routers can run in the kernel (for speed) or in user space (so we can modify them easily).
Mininet - How it Works
Nearly every operating system virtualizes computing resources using a process abstraction. Mininet uses process-based virtualization to run many (we’ve successfully booted up to 4096) hosts and switches on a single OS kernel. Since version 2.2.26, Linux has supported network namespaces, a lightweight virtualization feature that provides individual processes with separate network interfaces, routing tables, and ARP tables. The full Linux container architecture adds chroot() jails, process and user namespaces, and CPU and memory limits to provide full OS-level virtualization, but Mininet does not require these additional features. Mininet can create kernel or user-space OpenFlow switches, controllers to control the switches, and hosts to communicate over the simulated network. Mininet connects switches and hosts using virtual ethernet (veth) pairs. While Mininet currently depends on the Linux kernel, in the future it may support other operating systems with process-based virtualization, such Solaris containers or !FreeBSD jails.
Mininet’s code is almost entirely Python, except for a short C utility.
Mininet’s code is almost entirely Python, except for a short C utility.
Why Open vSwitch?
Hypervisors need the ability to bridge traffic between VMs and with the
outside world. On Linux-based hypervisors, this used to mean using the
built-in L2 switch (the Linux bridge), which is fast and reliable. So,
it is reasonable to ask why Open vSwitch is used.
The answer is that Open vSwitch is targeted at multi-server
virtualization deployments, a landscape for which the previous stack is
not well suited. These environments are often characterized by highly
dynamic end-points, the maintenance of logical abstractions, and
(sometimes) integration with or offloading to special purpose switching
hardware.
The following characteristics and design considerations help Open
vSwitch cope with the above requirements.
* The mobility of state: All network state associated with a network
entity (say a virtual machine) should be easily identifiable and
migratable between different hosts. This may include traditional
"soft state" (such as an entry in an L2 learning table), L3 forwarding
state, policy routing state, ACLs, QoS policy, monitoring
configuration (e.g. NetFlow, IPFIX, sFlow), etc.
Open vSwitch has support for both configuring and migrating both slow
(configuration) and fast network state between instances. For
example, if a VM migrates between end-hosts, it is possible to not
only migrate associated configuration (SPAN rules, ACLs, QoS) but any
live network state (including, for example, existing state which
may be difficult to reconstruct). Further, Open vSwitch state is
typed and backed by a real data-model allowing for the development of
structured automation systems.
* Responding to network dynamics: Virtual environments are often
characterized by high-rates of change. VMs coming and going, VMs
moving backwards and forwards in time, changes to the logical network
environments, and so forth.
Open vSwitch supports a number of features that allow a network
control system to respond and adapt as the environment changes.
This includes simple accounting and visibility support such as
NetFlow, IPFIX, and sFlow. But perhaps more useful, Open vSwitch
supports a network state database (OVSDB) that supports remote
triggers. Therefore, a piece of orchestration software can "watch"
various aspects of the network and respond if/when they change.
This is used heavily today, for example, to respond to and track VM
migrations.
Open vSwitch also supports OpenFlow as a method of exporting remote
access to control traffic. There are a number of uses for this
including global network discovery through inspection of discovery
or link-state traffic (e.g. LLDP, CDP, OSPF, etc.).
* Maintenance of logical tags: Distributed virtual switches (such as
VMware vDS and Cisco's Nexus 1000V) often maintain logical context
within the network through appending or manipulating tags in network
packets. This can be used to uniquely identify a VM (in a manner
resistant to hardware spoofing), or to hold some other context that
is only relevant in the logical domain. Much of the problem of
building a distributed virtual switch is to efficiently and correctly
manage these tags.
Open vSwitch includes multiple methods for specifying and maintaining
tagging rules, all of which are accessible to a remote process for
orchestration. Further, in many cases these tagging rules are stored
in an optimized form so they don't have to be coupled with a
heavyweight network device. This allows, for example, thousands of
tagging or address remapping rules to be configured, changed, and
migrated.
In a similar vein, Open vSwitch supports a GRE implementation that can
handle thousands of simultaneous GRE tunnels and supports remote
configuration for tunnel creation, configuration, and tear-down.
This, for example, can be used to connect private VM networks in
different data centers.
* Hardware integration: Open vSwitch's forwarding path (the in-kernel
datapath) is designed to be amenable to "offloading" packet processing
to hardware chipsets, whether housed in a classic hardware switch
chassis or in an end-host NIC. This allows for the Open vSwitch
control path to be able to both control a pure software
implementation or a hardware switch.
There are many ongoing efforts to port Open vSwitch to hardware
chipsets. These include multiple merchant silicon chipsets (Broadcom
and Marvell), as well as a number of vendor-specific platforms. (The
PORTING file discusses how one would go about making such a port.)
The advantage of hardware integration is not only performance within
virtualized environments. If physical switches also expose the Open
vSwitch control abstractions, both bare-metal and virtualized hosting
environments can be managed using the same mechanism for automated
network control.
In many ways, Open vSwitch targets a different point in the design space
than previous hypervisor networking stacks, focusing on the need for
automated and dynamic network control in large-scale Linux-based
virtualization environments.
The goal with Open vSwitch is to keep the in-kernel code as small as
possible (as is necessary for performance) and to re-use existing
subsystems when applicable (for example Open vSwitch uses the existing
QoS stack). As of Linux 3.3, Open vSwitch is included as a part of the
kernel and packaging for the userspace utilities are available on most
popular distributions.
Tuesday, February 25, 2014
Howto: install dctcp (or new kernel) in debian
As I was fighting with DCTCP (datacenter TCP) installation last week, here is the recipe on how to win this battle. Some of the steps are trivial but some of them like reading the old tactics and ensuring that you really won are not an obvious steps for new generals.
Prepare for the battle:
[ ~ ]>sudo apt-get install kernel-package libncurses5-dev fakeroot
Get instructions for operation "dctcp":
[ ~ ]>mkdir dctcp
[ ~ ]>cd dctcp
[ ~/dctcp ]>wget http://www.stanford.edu/~alizade/Site/DCTCP_files/dctcp-2.6.38.3-rev1.1.0.tgz
[ ~/dctcp ]>tar -xvvf dctcp-2.6.38.3-rev1.1.0.tgz
Get the battle plan:
[ ~/dctcp ]>wget http://www.kernel.org/pub/linux/kernel/v2.6/linux-2.6.38.3.tar.bz2
[ ~/dctcp ]>tar jxvf linux-2.6.38.3.tar.bz2
Prepare supplies:
[ ~/dctcp ]>cp dctcp-2.6.38.3-rev1.1.0/dctcp-2.6.38.3-rev1.1.0.patch linux-2.6.38.3
[ ~/dctcp ]>cd linux-2.6.38.3
[ ~/dctcp/linux-2.6.38.3] patch -p1 < dctcp-2.6.38.3-rev1.0.0.patch
Read old battle tactic:
[ ~/dctcp/linux-2.6.38.3 ]>cp /boot/config-x.y.z-amd64 .config
[ ~/dctcp/linux-2.6.38.3 ]>make oldconfig
Begin the battle:
[ ~/dctcp/linux-2.6.38.3 ]>fakeroot make-kpkg clean
[ ~/dctcp/linux-2.6.38.3 ]>fakeroot make-kpkg kernel_image
Battlefield after the battle:
[ ~/dctcp/linux-2.6.38.3 ]>cd ..
[ ~/dctcp ]>sudo dpkg -i linux-image-2.6.38.3_2.6.38.3-10.00.Custom_amd64.deb
Ensure the victory by signing boot contracts:
[ ~/dctcp ]>cd /boot
[ /boot ]>sudo mkinitramfs -o initrd.img-2.6.38.3 2.6.38.3
[ /boot ]>sudo update-grub
[ /boot ]>sudo reboot
Subscribe to:
Comments (Atom)